Author Archives: woodyjojo

Time To Eat Well

Over the last few weeks at work we have had some time to talk and discuss our dinner arrangements. I am constantly amazed how little my colleagues plan their meals- even the ones with children tend to plan only a day in advance. They complain that my method is “too much like hard work”, “too organised” and “too inflexible- what if you don’t want whatever is on the meal plan?”

So I thought I would write a little blog post explaining how it works, and how taking a little time to plan and shop once a week or once every 2 weeks means that Ian and I eat well and healthily without running to the shops every day, without spending hours cooking, and without resorting to quick-to-cook ready meals or junk food.

I now work an 11 hour day, with Ian working similar hours, and we have had to make some changes to ensure we continue to eat healthily- and well. As ever, it all centres around a meal plan – usually a 2 week plan, with a dinner assigned to each day. At the beginning of the plan I shop for everything I need to cook all of the meals- aside from fresh salad and things for later in the plan.

I then often spend the early part of my morning before work chopping vegetables, par-boiling potatoes, and taking things out of the freezer. I either leave instructions to Ian on the counter or send him a message at some point in the day explaining what dinner is, and what I need him to do to get it started. One of my colleagues complaints about this process is that her husband won’t help wihout being asked. That as may be, but if Ian doesn’t have instructions to follow when he gets in I don’t expect him to cook (although he usually checks the meal plan and if it’s something he recognises he will dig out a recipe and get started – I guess I’m very lucky like that!)

Here’s an example of a meal we cooked the other day.

This is a simple baked fish with caper and lemon butter on a bed of roasted Mediterranean veg. This is a fairly typical meal of what we like to call ‘fish Friday’. On this particular day, Ian went to work at 7. I left for work at 8:10, having already chopped the vegetables and put them in a roasting dish, along with some par-boiled potatoes. The fish I got out of the freezer to defrost throughout the day. I left a note with instructions for Ian when he got in.

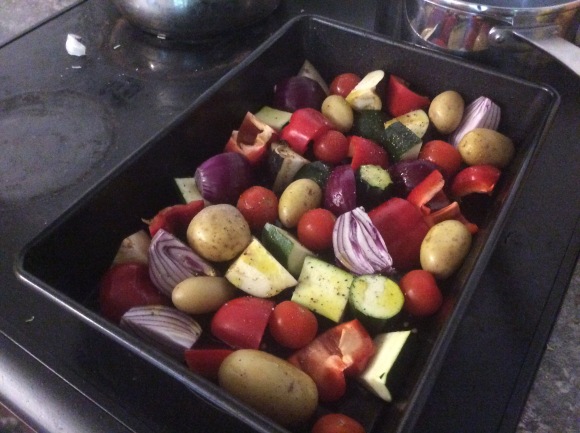
And off I went to work. I finished at about 7.10- fairly normal for me- and began the 20min drive home. When I got through the door, Ian had had about an hour to get in, water the garden, get the veg in and prepare the sauce, meaning that it was time to get the fish in.

10minutes later we sat down to this- a delicious example of how a meal plan, preparing ahead and working together means that we always have time to eat well.

Arm Knitting- So Much Fun!

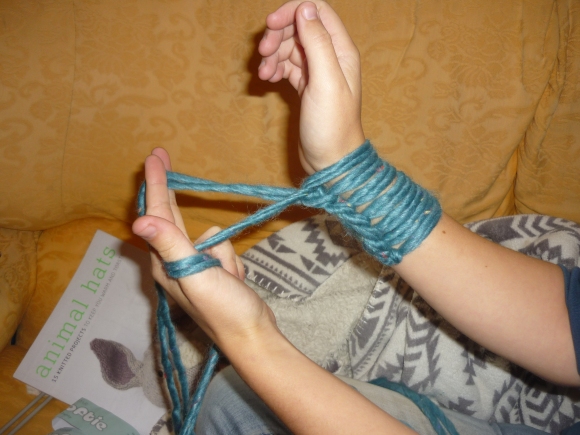
Well I gotta tell you, arm knitting isn’t the cheapest way to make a scarf (the wool can be pricey), but it might be the most fun!

P1090079

Arm knitting is all the rage- it’s very, very quick, it’s easy (even for beginners) and it produces the most gorgeous thick scarves and blankets! In knitting, the larger the needle (compared to the wool thickness), the looser the weave. So even the thickest wool can be knitted very tightly if you use too-small needles, and even light fingering wool can be loose-weaved when large needles are used.

With arm knitting, the knitter uses their arms instead of needles, which creates large, thick stitches. Thick wool is needed to ensure the garment doesn’t become too ‘holey’ like lace, but instead looks like a really chunky weave.


I won’t go into too much detail about how to arm knit. Firstly, it’s hard to describe how to do it, even with pictures. Secondly, many people have made many excellent videos about how to arm knit, so I’ll point you towards these instead:

P1090077

P1090078

The main hurdle I found with learning to arm knit was finding the best wool for the project. There are no handy lists of perfect ‘arm knitting’ wools and yarns, so I’ll post a few recommendations for wool types to get you started. You will need 2 x 50g balls of most of these, and knit holding both together (most yarns out there are just not thick enough!).


  • Sirdar Big Softie- very soft, lovely colours. Used in the pictures. Available here
  • Sirdar Faroe Chunky – beautiful mixed colours, very natural. Available here
  • Sirdar Indie- Available here
  • King Cole ‘Ultimate Super Chunky’ – pre-knitted tubes to allow for really thick knitting. Available here

arm-knitting-how-to-wool

I hope you have a great time learning to arm knit, and I’d love to hear how you get on in the comments below.

And to all my friends and family- be prepared for a lot of these this year! 😛

Tagged , , , , , , , , , , , , , , , ,

Christmas Hampers

Nearly everybody is getting a Christmas Hamper from us this year.

Christmas Hampers make fantastic presents for three reasons:

  1. They’re totally unique- nobody else makes lime marmalade or rose petal jelly quite like we do!
  2. They’re cheap- we’ve been preserving wild goods all year long!
  3. They’re edible, so it’s the gift that you can give again and again and again!

If you don’t know what to give to awkward family members this Christmas, I’d recommend a Christmas Hamper, full of homemade Christmas gifts! Here’s a few ideas of things you could include:

– Homemade jam or marmalade… look out for Guest writer Ian’s Lemon-and-lime marmalade recipe coming soon!
– Homemade wild jellies… like my chilli apple jelly, my rowanberry and rosemary jelly, my rose petal jelly… or one of your own!
– A small (or large!) bottle of homemade wine… or how about making an easy crab apple liqueur or beech leaf noyau?
– A hand-carved jam spoon, to go with the jams and jellies
– Some easy knitted gifts… like handwarmers, or an ear warmer, or a mug-snug. They take mere hours but make the hamper something really special!
– A pyrographied spoon, like this special Christmas one, or maybe a keyring or box
– Homemade truffles, biscuits or sweets, perhaps in a homemade box? This year we used the rose petal jelly from a previous year to make homemade Turkish delights!
– Homemade pate or ham

This list is by no means exhaustive! If you haven’t been as organised as us you could also buy some unusual things and wrap them in a hamper. This is a really good Christmas gift if you can fit it under a ‘theme’- i.e you could make a ‘sushi hamper’ for a sushi lover, complete with chopsticks, bamboo rolling mat, plates, soy sauce, and a really sharp knife. Or if you have a friend who loves meat, you could buy some nice ham, posh sausages, bacon, steak knives, and a kangaroo steak. If somebody likes cheese, how about a cheese board, knife set, two local cheeses and a camembert baking dish? The possibilities for making a Christmas hamper unique and delicious are endless!
Then all you need to do is buy a basket or box. Wilkos is doing ‘hamper baskets’ from £1.50 and small boxes from £1, but if you want to splash out and buy a nice wicker basket to be part of the gift then that makes a lovely present too. To save on money and keep it frugal, you can wrap up an old shoe box or supermarket box, or one year I spray painted those wooden boxes you can buy satsumas in this time of year… Wrap the whole thing up (cellophane looks really lovely!) by gathering all the wrapping at the top and tying with a big bow.

This year we’re including a little card with information on what everything is, and also asking for all our jars and bottles back so we can start all over again! 🙂

TA-DAH! It looks wonderful, costs almost nothing… and next year, you can do it all again!

Tagged , , , , , , , , , , , , , , , , , , , , , ,

Crab Apple Liqueur

There is the most beautiful crab apple tree on my campus at University. It is just covered in tiny pink apples no bigger than a 10p piece, and they lend the most beautiful colour and flavour to many recipes, including the crab apple jelly and the chilli apple jelly I have already posted about.

Desperate not to waste any crab apples, I also set about making some crab apple liqueur. This is a very simple recipe but results in a really taste schnapps that can be sipped after dinner… much like sloe gin!

  1. Pick 20-30 crab apples. Cut them in half, removing pips when you can be bothered and place in a large jar.
  2. Cover with vodka (I used some from Aldi- it’s fairly cheap!)
  3. Add 100-200g of sugar (you can always add more later!) and screw on lid.
  4. Place at back of cupboard and invert occasionally to encourage sugar to dissolve.
  5. Taste. When it is ready, strain into bottles.
  6. Drink and gift- well done!
Tagged , , , , , , , , ,

Chilli Apple Jelly

Last year we were given a Christmas Hamper with the most delicious chilli apple jelly in! It was beautifully apple-y with a definite kick of chilli, and went delightfully well with brie!

We ran out a couple of weeks ago, but decided to make some ourselves for our own Christmas hampers- and make sure we got to keep some too! I phoned the friend that gave us them in the first place, and got a recipe, although it was somewhat vague… but it gave me something to work with!

So here’s my Chilli Apple Jelly recipe, adjusted from a recipe courtesy of Bella and Ben!

If you want to skip some steps, juice some apples and simmer them with chillies for a while, before going straight to step 7.

  1. Pick some crab apples. I got a whole plastic bag full.
  2. Put them in a saucepan and cover with water
  3. Add some chillis. It’s hard to say how many. I used 4 medium red ones from Aldi, plus one cayenne and a couple of hot ‘Apache’ that we grew this year…. if you’re not sure, aim for under rather than over as you can increase it later!
  4. Boil the apples and chilli for 45 minutes to an hour, until the apples are very soft.
  5. Strain through cheesecloth or muslin overnight by hanging from a cupboard door and allowing it to drip into a bowl. DON’T be tempted to squeeze as it will make your juice and jelly all cloudy!
  6. The next morning, stir your juice, and then taste. How’s the chilli kick? If it’s under, add some chillis in a muslin bag to step 8, or stir crushed chillies into the jars in step 10.
  7. Measure out the juice, and add sugar 500g to 500ml of juice. I used half granulated and half pectin-sugar to ensure I got a good set.
  8. Simmer in a pan until sugar is dissolved
  9. Turn up the heat until it reaches a rolling boil and start checking for ‘set’ by putting a drip onto a cold plate, looking for the characteristic ‘wrinkle’ under your finger. Repeat.
  10. Once it has reached the set point, pour into sterilised jars and seal! Don’t forget to add a pretty label!


Tagged , , , , , , , , , , , , , ,

Mealplan Series- Number 1

So here’s my first post about meal plans! I’ve sat down with my cookbooks and worked out what we’re going to eat for the next two weeks…. so here we go!

(Please note that as Ian is away Mon and Tues night I tend to stick to pasta or leftovers- sorry there’s nothing too specific!)

Weds 22nd- Lasagne (and pear tarte tatin pudding- will last all week)
Thurs 23rd- Prawn Laksa
Fri 24th- Pheasant Stew
Sat 25th- Homemade Pizza
Sun 26th- Lamb breast roast
Mon 27th- (Pasta putanesca, pasta pesto, sausages chips and beans, leftovers)
Tues 28th- (Pasta putanesca, pasta pesto, sausages chips and beans, leftovers)
Weds 29th- Sausage Cassoulet
Thurs 30th- Pumpkin risotto
Fri 31st- Baked Pork Chops with cabbage hash
Sat 1st- Sticky Chicken Wings (Nigel Slater Recipe)
Sun 2nd- Thai Roast Chicken
Mon 3rd- (Pasta putanesca, pasta pesto, sausages chips and beans, leftovers)
Tues 4th- (Pasta putanesca, pasta pesto, sausages chips and beans, leftovers)


So here’s my shopping list:

Meat:
Pork chops (for baked pork chops)
Sausages (for cassoulet)
Chorizo (for pizza!)
Lamb breast (for roast)
(I have mince, pheasant, prawns and chicken wings in the freezer, so haven’t put these on the list, and I will buy chicken nearer the time as there’s no room in my freezer)

Fruit and Veg
Carrots (for pheasant stew)
(I already have pumpkin, potatoes, garlic, ginger, onion, pears and cabbage, so these aren’t on the list)

Dried and Tinned
Caster sugar (for pear tarte tatin)
Pasta sheets (for lasagne)
Olives (for pizza)
(I already have noodles, tinned beans, coconut milk, risotto rice, pesto, tinned tomatoes, puff pastry, honey and mustard, so these aren’t on the list!)

Dairy
Cheese (for lasagne)
Mozzerella (for pizza)
Butter (for pear tarte tatin)
Milk (for lasagne)


I shop at Aldi, but for your convenience I also looked at the prices from Tesco and Sainsbury’s. I didn’t brand match, I took the cheapest that was the same weight or same style (sliced chorizo, for instance, rather than the stick type!) And here are the results:

At Aldi, these items came to £15.13

At Tesco, £21,71

Sainsbury’s came to £20.67


So there we go- some meal ideas along with a quick price comparison for the ingredients- sorted! 🙂 Some of the meal ideas above should have recipes available on my blog… I’ll link what I can, and more will be coming later!

Tagged , , , , , , , , , , , , , , , , , , , , ,

Cheap Meals Series

I realised that I spend a lot of time writing, buying and making cheap meals, and I decided the world might like to read about these also.

Every couple of weeks I sit down with a piece of paper and make a meal plan for the next 2-3 weeks. It begins with checking the fridge, freezer and cupboard for what we already have, and what needs using up. Then I check the calendar for any events that I need to include- if Ian’s away, for instance, there’s no point making roast! Then I fill in the days on my meal plan, flicking through my recipe books as I go, and also thinking about what I can buy and when- liver always goes on the plan no more than 2 days after my shop, and cupboard-meals like tuna pasta bake go on later, when the fresh things start to run low.

So I’ll make a series of blogs of my meal plans, and how much they cost to buy. To make things easier for you, I’ll even compare prices on a few supermarket website so that you can choose where you want to shop!

The first in the series will be available tomorrow!


Tagged , , , , , , , , , , ,

Wild Duck and Pheasant Feast!

One of my lecturers at university was kind enough to give us a whole heap of game that she had shot over the weekend. There were pheasants and ducks, all still with feathers and guts intact!

pheasants-ducks-wild-game

So I needed to learn how to prepare game, and fast!

I decided to hang some the pheasants for a little while in my new freezer, which I hadn’t turned on yet! I turned it on, let it get cold, then turned it off again, making a sort of fridge. I’ll probably turn it on once a day for a couple of days to keep it cold. In a few days I’ll take them out and treat them just like the other pheasants I’ll prepare now- it just saves me having to do it all at once! Apparently hanging improves the flavour-yum!

wild-shot-pheasants-prepare

For the ducks, I decided to pluck them and freeze the breasts and legs seperately. I’m not going to go into detail as to how I plucked them here, but I roughly followed this great video from the guys at Hunter Angler Gardener Cook: https://www.youtube.com/watch?v=VFtVqBKjWFs The wax really worked, but I used candle wax, as it’s all I had lying around. You need a fair bit, but in my opinion it seems to be worth it! For the second duck I just plucked and waxed the breast- this saved a lot of time whilst still enabling me to get some lovely breasts out of it!

For the pheasants, I ended up skinning them and removing the breasts and legs. Here’s how I skinned them:

  1.  Lay birds on back and pluck breast to reveal skin.skin-pheasants-shot-gamePheasant-skinning-how
  2. Use scissors to cut into skin and slice up the breast towards the head.

    pheasant-skinning-plucking

  3. Peel back skin (‘like taking off a cardigan’- my mum’s words!)

    SKin-Pheasant-prepare-shot

  4. Take off breasts just like you would for a chicken.
  5. Dislocate hip and insert knife into joint space, then cut through as you would for a chicken. Peel the skin off the leg
  6. Use knife or meat scissors to cut through the leg bone at the joint where the feet meet the feathers!


Stay tuned for some lovely recipes to come from all this delicious meat! I’m planning on game pie, pheasant casserole, game terrine, duck confit, and lots more!

Tagged , , , , , , , , , , , , , , , ,

Crab Apple Jelly

Ah, I do love autumn, have I mentioned that yet? I found a crab apple tree just bursting with beautiful pink fruits, and decided I just had to get going on little Christmas gifts. I collected a huge bag of fruits, and set off making crab apple jelly!

Here’s my recipe for crab apple jelly:

1. Prepare your crab apples. I just removed stalks and any blemished ones and put the whole lot into a saucepan.

2. Pour over boiling water to just cover.

3. Simmer for an hour until apples are soft.

4. Pour into muslin and tie corners together to make a bag. Hang from cupboard door handle, allowing it to drip into a bowl overnight.

5. The next day, discard anything left in the muslin WITHOUT SQUEEZING (this will make it cloudy!

6. Measure juice, and weigh out 450g of sugar for every 600ml juice (around 0.7:1 ratio of sugar to juice)

7. Place sugar and juice, and some lemon if desired into a saucepan and boil. Stir to melt the sugar, and allow to reach a rolling boil.

8. Boil for 20 minutes before you start to test for ‘set’- this is best done by placing a plate into the freezer. Every 5mins or so, place a drip of the misture onto the plate, leave for a minute, then run your finger through it. If the surface wrinkles as though it has a skin on, the jelly is ready!

9. Allow to cool for a couple of minutes before pouring into sterilised jam jars. Seal and leave to cool.

Ta-dah! Amazing and delicious jelly, perfect for giving as gifts! It’s the most gorgeous colour of pink/red, and I’m really proud of it! All that is left to do to ready it for gifting is a beautiful label- I’ll make those tonight!

Tagged , , , , , , , , , , , ,

Prawn Laksa

I was first introduced to Laksa by a friend who cooked it for our ‘one-pot’ games night. It’s a delicious Indonesian dish of many rumoured origins- Malaysian, Chinese, Vietnamese… but comes in somewhere between a Thai green curry, noodles, and a soup.

laksa delicious asian soup

Ian absolutely loves it, and it’s seriously quick to make, so I love it too! Google it, and you’ll find many interpretations from the traditional to the easy. Mine’s a decent mixture of the lot and is designed to be easy without compromising on taste! Don’t be put off by the list of spices and Thai ingredients, just add what you’ve got and don’t panic if you haven’t got it all!

To make:

– Warm some vegetable oil in a pan, and add a dash each of: Ground coriander, ground cumin, cumin seeds, and turmeric. Then add chopped garlic, chillies, onions and ginger, and lemongrass if you have it. Add lime rind and stir, allowing the spices and others to brown slightly, before adding a splash of fish sauce (‘nam pla’) and a little coconut milk, to keep it all from sticking.

Note: If you prefer even more authenticity, blend the above before you start frying it

– To this, add the rest of a can of coconut milk (or, to taste) and 200mls of chicken or vegetable stock. Bring to the boil and reduce, adding matchstick carrots if you wish. If you don’t want to reduce, simply don’t add all the stock and coconut milk- about half will do!

– When the sauce is reduced slightly, add your noodles (pre-cooked if they aren’t ‘straight to wok’) and your prawns, along with the juice from the lime. Here you can also add spring onions, beansprouts, spinach or pak-choi to the pan if you wish to.

-Serve in deep bowls with a lime wedge and extra slices of chilli on top for those who like it hot. Yum!

P1090052

Tagged , , , , , , , , , , , , , , ,

Autumn Harvest- 3 Favourite Blackberry Recipes

Well, if it isn’t that time of year already!

The hedgerows are full of fantastic fruits, just begging to be picked. Great big blackberries that are so ripe they melt in your hand; smaller, tighter fruits that leave a fruity tang; plum trees, their boughs bending under the weight of the fruit they hold; elderberries, black and round, tumbling from trees like jewels… two for the basket, one for the mouth… sweet sticky fingers, a trace of telltale pink around the mouths of all…

I love autumn, can you tell?

So just because it’s so lovely, here are my 3 favourite frugal things to do with all those tubs of blackberries!

Blackberry Jam

Yum. A firm favourite in my house, so that several batches have to be made to allow any to be left for gifting at Christmas! This dark purple-black jam is thick, spreads well, and is high in vitamins C and K, so it’s great for staving off those winter colds!

Blackberry-jam-recipe-ideas

Blackberry Wine

After making this for the first time last year, it has become a must-do in our house! The rich colour of the blackberries lend themselves to making a red, and it’s ready very quickly! We drank our first bottle on Christmas eve, and it was our best success yet! Even my parents drank it- the bottle was gone in no time!

Blackberry-wine-recipe-ideas

Blackberry and Apple Crumble

The classic use for blackberries, this traditional pudding is what most people think of when they collect blackberries. Easy to make, and a great one for the kids to get involved in, it’s perfect after a Sunday Roast!

For a slight twist, try freezing the blackberries and chopped apples in tubs in the freezer, and making a batch of topping, then putting it in the fridge. Then, whenever you need a pudding it’s no hassle at all to put together a miniature crumble in a ramekin! I make these most nights in the winter as they’re a low-sugar pudding, portion-controlled, and are quicker to cook than their big cousins. Just chop half an apple into each ramekin, add 4-6 blackberries, sprinkle over topping, then bake for 10-15mins!

Mini blackberry and apple crumble

crumble recipe


Go on out and pick a tub… it’s free entertainment AND free food!

What are your favourite recipes with blackberry? What do you do with them each year? Let me know in the comment section!

Tagged , , , , , , , , , , , , ,

A summery maxi dress…


Ah summer may be almost gone, but my sewing projects have finally caught up with the season!

In preparation for summer, I decided to make a maxi dress… (Everyone who knows me will know that being 5ft tall is a real problem when it comes to clothes, and maxi dresses are the worst… I own one, and it was handed down to me when a friend shrunk it in the wash! Nothing else fits!) only then my sewing machine broke and it’s now autumn!

Oh well, it’s ready for next year then!

Anyway, making one means that I can actually make it fit, and I really like the design on this one here. The blocked colours make it easy to make, and I love the use of old t-shirts to make the dress!

Unfortunately, without any old t-shirts to raid I went to the next best thing: Primark! I wanted to do the colourblock thing, but I decided to do them in darkening colours- from a white top down to a navy blue at the bottom! Four cheap t-shirts later and I had all I needed to get started!

First, I cut the hems and the necklines off the t-shirts, so that I had bands of coloured fabric. Don’t cut the hem off the bottom one, it means you don’t have to hem it yourself!

Next I pinned and sewed the strips together inside-out. The light blue strip was a little large so I cut it down to size and re-joined it. I then sewed all 3 to the top, and ta-dah! Done!

Except I put it on and the light blue one was totally see-through…. so next thing was another shopping trip to Primark, to get an identical blue t-shirt. I sewed this one to the inside, like a lining, and my underpants were no longer visible… at least not without looking too hard!

I’ll post some photos of me wearing it… it’s pretty cool!

DIY-dress-colour-block

P1090030

Colour-block-DIY-dress

Tagged , , , , , , , , , , , ,

An accident and a lesson learnt…

We’re very busy moving house right now, sensibly (or stupidly) spreading it over 2 weeks. Tomorrow, the first load goes up, which is everything we don’t need desperately over the next two weeks…. even the table is going!

A picture for you…. upstairs, the study is totally taken apart. Beds are standing against the wall next to bookcases, both with nuts and bolts taped to the side so we don’t lose them. Downstairs, boxes take up most of the living area, all ready to pile into a van tomorrow. And several cans of cleaning stuff, polish and mould remover stand ready around the house, waiting to jump into action.

In amongst all of this, we went blackberry and elderberry picking. It’s that time of year and I’m not one to let a good harvest go past without taking full advantage of it! The blackberries went straight into the freezer, but unfortunately the elderberries didn’t fit!

Not to let them go to waste, the best thing to do seemed to be to blend them and get them ready for fermentation, but not add the yeast until we were in the new house- it was only a couple of days!

Despite adding a campden tablet, Ian did report that it seemed to be hissing slightly, so we decided to add another. After a good long hunt, I found the campden tablets at the bottom of a box and went to open the bottle. Almost instantly, it started fizzing purple juice all over the table. Catching it in my hands I yelled to Ian to help, and he came running with a tea towel and caught it before it ended up all over the rental carpet.

Using a plastic bag, the tea towel, and a whole roll of paper towel to catch the fizz, we rushed it outside.

Coming back in to inspect the damage, and fearing the worst, I was impressed to note that only a few drops had ended up on the carpet. I went to report this to Ian, along with an idea for the clean-up. Just at that moment, Ian tried to release the pressure and the lid of the flagon flew 5-6m into the air- accompanied by a POP and a shower of a litre and a half of elderberry juice!

Ian was COVERED, I, less so, but was thankfully in the doorway, protecting the house from the worst of it. My washing was less lucky, and has gone in for a second rinse!Elderberry Explosion!

The kid next door saw the whole thing, but his main concern was whether it was blood, or tomato ketchup!

Luckily, it seems to have come out of the rental carpet, which up until now had not suffered too badly from our year of residence…

A lesson learned!


Tagged , , , , , ,

A seashore forage and rock samphire pickle

With two weeks in Alderney this year, we had plenty of time to explore the coastline and find some forage-able foods!

Clonque beach is a stunning rocky shore about 15mins from my parents house, and is overlooked by an ancient Victorian fort (Fort Tourgis) and guarded by a second fort (Fort Clonque) that protects the bay and is only reachable by causeway. It makes excellent foraging grounds due to the gentle slope, which at low tide reveals rocks, rockpools, and sandy causeways, all teeming with fish, crabs and seaweed!Foraging-Clonque-Alderney-Rock-Samphire

P1080911We picked four or five different seaweeds for tasting and also a great deal of rock samphire. Rock samphire is not related to marsh samphire, but it is reputed to taste similar, hence the name. It is found on coasts, but only where the sea will never touch it- and for this reason it is rumoured to have saved quite a few mariners from drowning! If samphire grows on a rock, it will be safe from the tides and waves, even in the worst storms!P1080916

We found it all around Alderney, and picked a plastic bag full (which was barely enough for two jars, in the end!) We then used it to make a pickle for gifting at Christmas!

First, soften some onions in butter. Add a bay leaf, vinegar, spring onions and peppercorns and leave to reduce.

making-samphire-picklerock-samphire-pickle-vinegar

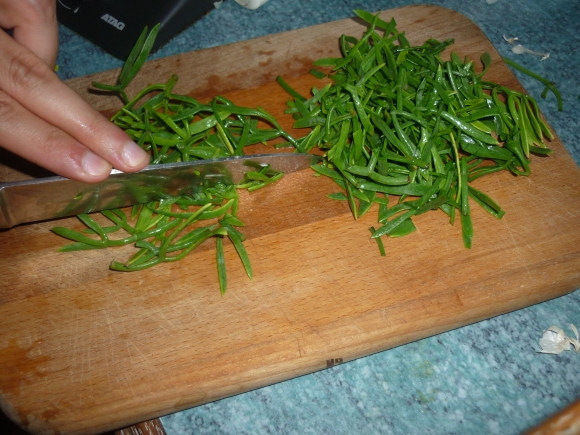
Then wash and roughly chop your samphire:

Rock-samphire-pickle-chopAnd wash and sterilise your pots:

P1080992Lastly, blanch your samphire in hot water for 1-2 mins, then remove and stuff into hot jar. Pour vinegar mixture over the top, add a drop of oil to form a seal, and screw on the lid.

Rock-samphire-pickle-finished

So there you have it- simple and quick to make, tasty to eat, and a perfect, unusual gift!

Tagged , , , , , , , , , , , , ,

Pyrography… a new skill

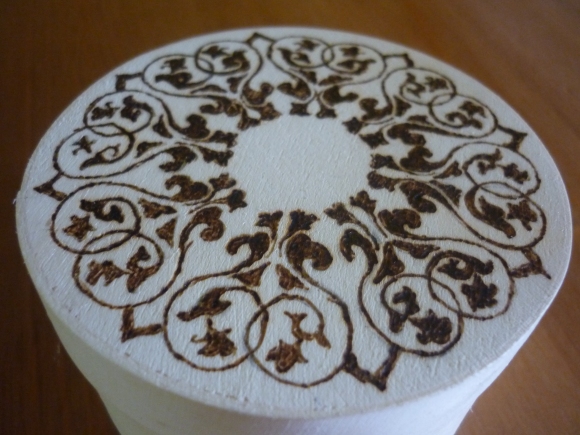
Pyrography literally means ‘fire-pictures’ and is the act of using a hot rod to burn a design into wood or leather. It’s a little like drawing, but it has a number of pitfalls.

Unlike drawing, the darkness of the burn depends on two things- the heat of the iron, and the length of time you hold it in place. So you can’t pause to think where you’re going next! For this reason, the more detailed the piece, the harder it is to do!

I’ve been working on these little boxes that I bought from Craft & More in Broadmead, Bristol, and used them to work on my style.

Celtic-knot-pyrography-box

Heart-pyrography-box


Pyrography-treasure-box

Butterfly-box-pyrography

Celtic-knot-box

I’ve also been making these little keyrings from cross-cut round wood which has been sanded and polished up. (Yes, I cut and sanded it myself- by hand!)

Pyrography-keyrings

Pyrography-keyring-anchor

The patterns are usually drawn in pencil and then burnt into the wood, but for some of the more complicated patterns I’ve been tracing from a print out. Cheating, I know, but look how complicated some of them are!

Celtic-star-box

Box-pyrography-flower-pattern


Anyway, pyrography kits can be cheap for basic ones (we got ours for around £20) and provide hours of entertainment! The things you make are really individual and are a work of art in themselves. They make great gifts too!

Tagged , , , , , , , , , , , , ,